How to setup a Raspberry Pi for remote Access
IMPORTANT - Please back up your Pi. I cannot be held responsible for any loss of damage caused by following this article. Please read the disclaimer given in the links at the top of this page.
First up - give your Raspberry Pi a Static IP Address
This project uses the Pi 2 with Raspbian installed and updated before installing the SDR software.
To log in to your Raspberry Pi remotely, you'll need the IP of the Raspberry Pi. This tells the host computer where to look for it on the network. By default, the Raspberry Pi will be given an IP automatically by the router (called Dynamic IP and denoted by DHCP) when you connect to a network. However, this can change every time you remove the Pi from the network e.g. turn it off. Having a static IP isn't essential, but it will make repeated access to the Raspberry Pi especially via SSH much simpler, as you'll always know that the Raspberry Pi has the same address. Just think how much fun your 'postie' would have if your house constantly changed location :-)
If you were lucky and ordered your Pi with the official Raspian OS release installed then go ahead and run it for the first time and install it. If not, you can download it from Download Raspbian
If you are new to the Pi, then download Noobs, if not then download Raspian.
To copy the image to your SD card from your PC you will need to install win32DiskImager from Sourceforge. Download from sourceforge. There are plenty of very good tutorials on how to use it on the Internet
I'm also assuming that you've connected your Pi to a network via Ethernet. If you're going to be logging into your Pi remotely for most tasks, then I recommend its easiest and fastest method. WiFi is slower.
A. Checking Your Set Up
Boot into Raspian and log in (Username. pi, Password. raspberry), this will all be command line stuff, so there is no need to log in to the GUI. First, we need to list the network interface we currently have available: Type in: cat /etc/network/interfaces You will probably get something similar to this.
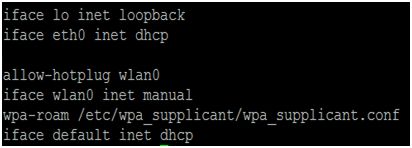
The line . . . . iface eth0 inet dhcp shows us that we're currently getting our IP address via DHCP, meaning it's being dynamically registered by the router. This is what we want to change!
B. Gathering Information
First of all we need to grab some information from our router and Pi. There's a couple of commands we need to run to get this info. So time to go retro and have a pen and paper handy! . . .
Now type ifconfig
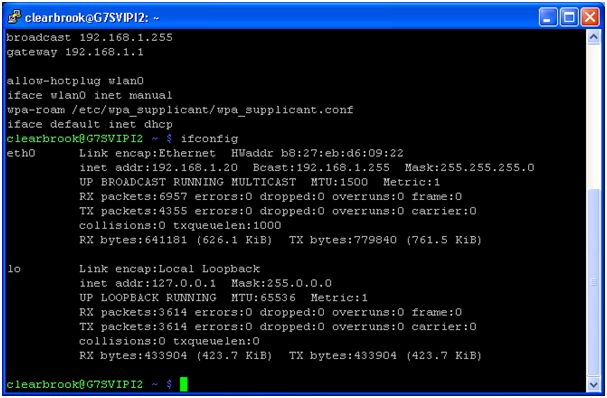
This reveals your router information and the bit you want is after eth0 (the ethernet connection). . . .
eth0 Link encap:Ethernet HWaddr b8:27:eb:d6:09:22 (yours will be different)
inet addr:192.168.1.20 Bcast:192.168.1.255 Mask:255.255.255.0
So now it is time to down the following information. . .
inet addr - 192.168.1.20 (This is your Pi's Current IP Address)
Bcast - 192.168.1.255 (The Broadcast IP Range)
Mask - 255.255.255.0 (Subnet Mask Address)
Now we need a little more information before we proceed. So type in the command. . . netstat -nr (route -n would give you the same info.)

So we need (in my case. Yours may be different):
'Gateway' Address - 192.168.1.1
'Destination' Address - 192.168.1.0
C. Editing the Network Configuration
We now need to plug this information into the Pi's network configuration file using a text editor. I always use the nano text editor. If you are an experienced Linux user you can also use Vim. Type sudo nano /etc/network/interfaces
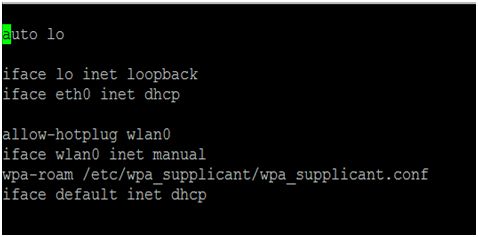
Simply change the line that reads:
iface eth0 inet dhcp to iface eth0 inet static
Then directly below this line enter the following (Please Note. You will need your own addresses we gathered in Part B above, more details below). . . .
address 192.168.1.20
netmask 255.255.255.0
network 192.168.1.0
broadcast 192.168.1.255
gateway 192.168.1.1
To help you, here is an explanation of what each part means:
address - The address you want to give your Pi, this can be any IP in the network range, but it's usually advisable to go higher rather than lower, or you could end up logging different devices to the same IP! (I've been there and done it). I've selected 192.168.1.20, as I was already registered to that address (denoted by 'inet addr'), but this can be any IP address from the range192.168.1.1 to 192.168.1.255.
netmask - The 'Mask' address we wrote down earlier.
network - The router IP address, this is the 'Destination' Address was found earlier. You can also grab this off your router, it should say on the side somewhere.
broadcast - The 'Bcast' address we wrote down earlier.
gateway - This is the 'Gateway' address we found earlier.
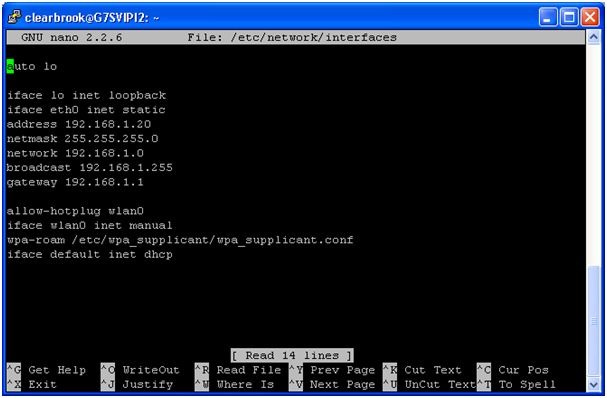
So, now your configuration should look something like the above, but with your values! Remember to save before exit. To do this CTRL+X (exit) then enter y for yes to save your changes!
D. Re-check The New Static IP Configuration
Now we can reboot and check our changes. Type sudo reboot Log back in and now type ifconfig This should confirm your new settings.
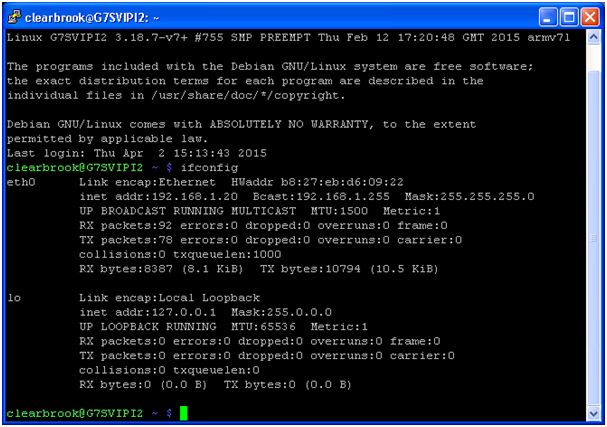
To double check all is working as it should, ping your 'Gateway' Address which for me is: Type ping 192.168.1.1 -c 5 (the -c 5 command simply denotes that you want to ping it 5 times, if you forget to add this, it will ping the address continuously. If you forgot to add it, then to stop it press CTRL+C)
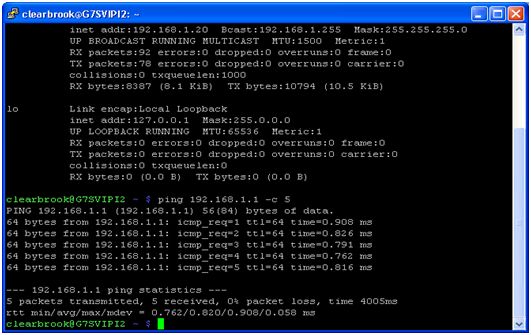
If all is well, this should ping successfully and all packets should be received. If something's not right double check through all your IP addresses, and make sure you're pinging the right address too. Remember you can always revert back to DHCP by reversing these steps. The 'network' router IP address is sometimes a little fiddly, so be sure to check that if you're still having issues! Hopefully however, your Raspberry Pi is now set up with a static IP address! So it is time for a cuppa before the next step on our way to Pi Nirvana.
Second Step - Pi Security. Change the user
Everyone knows that the standard pi login is Pi as the username and raspberry as the password. Unfortunately, so do the bad guys! So we want to make their lives as difficult as possible.
So:
1. Don't use the default password
2. Change the default user
To do this
Type: sudo useradd -m username -G sudo (where username is the new account name)

The -m switch creates a new home directory while the second sudo adds the new account to the superusers group
Now we need to give the new account a password. This is slightly different to when you set up your Pi. Type: sudo passwd username (where username is the new account name). When prompted enter the new password (you should be asked twice)
Reboot and login using your new account to make sure that it is working. Type: sudo reboot
Now we can delete the default raspian account. First of all type: sudo visudo
Enter your password when prompted as we are working as admins now.
add in the section # User privilege specification
username ALL=(ALL) NOPASSWD: ALL
DO NOT change the line that begins with root and change my username for your new one
Now look for the section further down that begins #includedir /etc/sudoers.d and change the username 'Pi' to your new one.
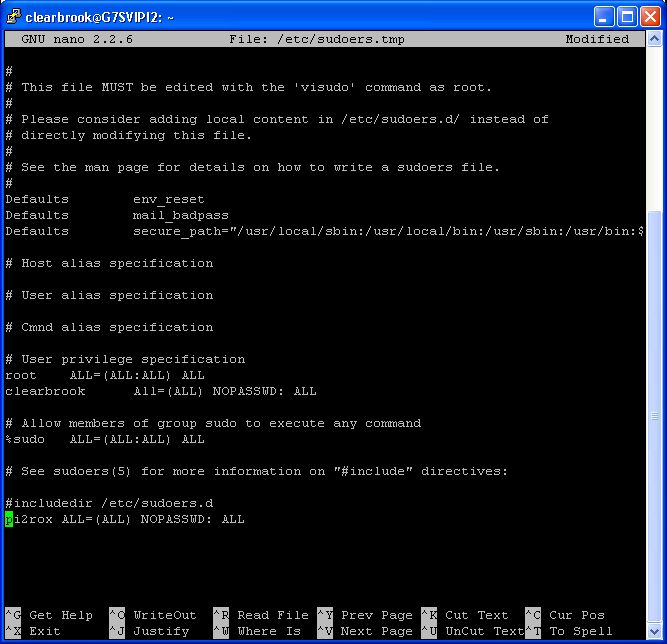
Press ctrl +x then type y then press enter to save and exit. Now you can safely delete the old account. Type sudo deluser pi
Now remove the old home directory. Type sudo deluser -remove-home pi
Now reboot to make sure that all is done. Type sudo reboot
Congratulations!! Time for another cuppa
Step three - Now to install our remote connection
If you are still with me. Well Done!!! You are nearly there. Not much more to go. So the first thing now is to set up our Pi to allow access from another computer. We can do this using a free piece of software called tightvnc. The tightvnc client is also available for Windows, but on our Pi we are going to run the server, not the client that we will use to connect.
So; Log in to your Pi and install the Tight VNC Package. Type: sudo apt-get install tightvncserver and press enter
Next we will run TightVNC Server which will prompt you to enter a Password and an optional View Only Password. So at this point, get a pen and paper and make a note of your passwords ;-)
Type: tightvncserver and press enter. When asked if you want to set a viewer password. You do not have to, but if you do, press y then enter and you can type that password
Once that is done, whenever you boot your Pi, you can start a VNC server from the prompt. This example starts a session on VNC display one (:1) with a resolution that I want to use over both my local connection and over the web so I want to keep bandwidth usage down. You can set whatever resolution you want just by changing the script The default desktop on the Pi always uses 0 for it's display which is why we are using :1 for our VNC Server:
Type: vncserver :1 -geometry 1024x768 -depth 24
(If fonts appear the wrong size, add '-dpi 96' to the end after '-depth 24'.) Or you could create a script to save typing in the whole thing which is what we are going to do. Use this script if you do not want the VNC server to run automatically when you boot your Pi. If you do want to automate, then you can ignore this and follow from 'Instead of having to run this we now want to automate and run when we boot our Pi'
Type: nano svnc.sh (alternatively, you can call the file whatever you like as long as you add the '.sh')
Add the lines (but don't forget to change the resolution for whatever you are using):
#!/bin/sh
vncserver :1 -geometry 1024x768 -depth 24 -dpi 96
Now press Ctrl-x then enter y and press the enter key to Exit Nano and save the file
Now we set our file to Execute. Type: chmod +x svnc.sh
then to run it Type: ./svnc.sh
Instead of having to run this script every time we boot our Pi, we now want to automate and run when we boot our Pi
So start a root session
Type sudo -i
Create a file in /etc/init.d with a suitable name such as vncboot with the following content. So for example type: nano /etc/init.d/vncboot
You can also change the depth settings in the script for your own. This was setup for internet access over a slow connection.
IMPORTANT!
If you intend to access your Pi over the Internet, you will need to edit the line
/usr/bin/vncserver :1 -geometry 1024x768 -depth 16 -pixelformat rgb565
To
/usr/bin/vncserver -localhost :1 -geometry 1024x768 -depth 16 -pixelformat rgb565
What we are doing here is to ensure that we make things hard for the bad guys and we will need to access using another program as well which I describe later. If you are not planning on accessing via the internet, you do not need to change the line.
#!/bin/sh
### BEGIN INIT INFO
# Provides: vncboot
# Required-Start: $remote_fs $syslog
# Required-Stop: $remote_fs $syslog
# Default-Start: 2 3 4 5
# Default-Stop: 0 1 6
# Short-Description: Start VNC Server at boot time
# Description: Start VNC Server at boot time.
### END INIT INFO
USER=root
HOME=/root
export USER HOME
case "$1" in
start)
echo "Starting VNC Server"
#Insert your favoured settings for a VNC session
/usr/bin/vncserver :1 -geometry 1024x768 -depth 16 -pixelformat rgb565
;;
stop)
echo "Stopping VNC Server"
/usr/bin/vncserver -kill :0
;;
*)
echo "Usage: /etc/init.d/vncboot (start|stop)"
exit 1
;;
esac
exit 0
Now press Crtl+X enter y to save our new file. Next we need to modify the file permissions so it can be executed
Type: chmod 755 /etc/init.d/vncboot
Then enable dependency based boot sequencing
Type:update-rc.d /etc/init.d/vncboot defaults
If enabling dependency based boot sequencing was successful, it says
update-rc.d: using dependency based boot sequencing
But if it says
"update-rc.d: error: unable to read /etc/init.d//etc/init.d/vncboot"
then the following command should fix it
Type: update-rc.d vncboot defaults
Reboot your Raspberry PI and you should find your new shiny vncserver already started.
Thank you for reading this and have fun
So what else is there?
I built the site mainly because of my hobbies. Please note, all external links have been coded to open in a new page. I enjoy online gaming, Raspberry Pi and Arduino coding and Amateur Radio. I also enjoy gliding, flying both the real thing and Radio Control. These pages can be viewed using the links in the left-hand column.


