IMPORTANT - Please back up your Pi. I cannot be held responsible for any loss of damage caused by following this article. Please read the disclaimer given in the links at the top of this page.
Background
There was an article released in the February issue of RadCom by Mike Richards G4WNC about streaming SDR data using a Raspberry Pi B/B+ but in the article he used Pidora.
With the release of the Pi2 I wanted to investigate using an SDR server some more but as a STEM Ambassador wanted to use Raspbian instead.
A) It is the default OS in use by schools
B) Most people know Raspbian and have some knowledge of how to use it
Also, by using a cheap RTLSDR bought from eBay for a few pounds, it is an easy introduction to the world of SDR, especially when paired with the Raspberry Pi and was a fun project. I apologise if you are an experienced Pi user but in the spirit of being available to all, I want this document to be followed by anyone who is new to this great world.
So this project uses the Pi 2 with Raspbian installed and updated before installing the SDR software. I'll assume that the user has first updated their Pi. The beauty with this project is that the team at Osmocom have already created software that creates the server for you. So I'm eternally grateful to them for all of their hard work. Please visit their SDR site Osmocom SDR Page
Before we can install the RTL drivers, we will need the following dependencies, so if they are not already installed (You can check by copying and pasting the code inside the brackets and you should get a response saying it is installed if it is) all we need is to type the following commands in the terminal window at the prompt.
sudo apt-get install git (dpkg -s git) Git will already be installed in the latest release
sudo apt-get install cmake (dpkg -s cmake) This will probably need installing
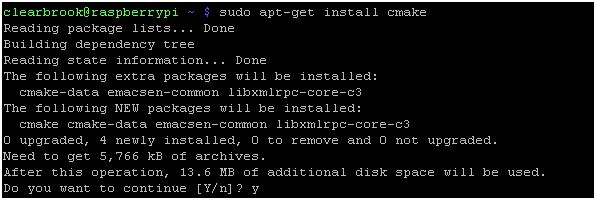
When prompted, enter y then press enter and allow it to complete
sudo apt-get install libusb-1.0-0-dev (The latest version of Raspbian already has libusb-1.0 installed but I found that to avoid errors when installing, I had to install the dev version shown in the install line)
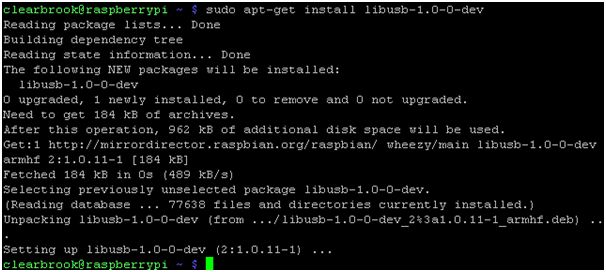
sudo apt-get install build-essential (dpkg -s build-essential) This should also already be installed
We also need to ensure that ssh has been enabled on the Pi and that a suitable application such as puTTY is available to connect to it should the SDR Server fail to respond.
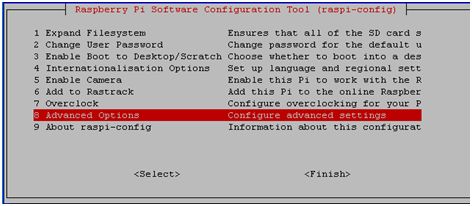
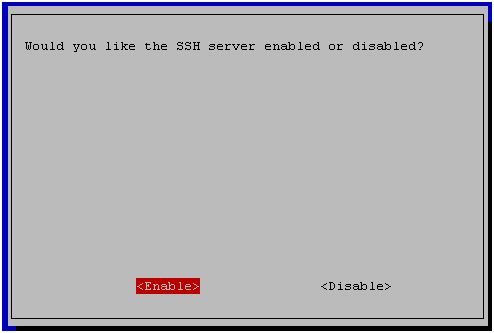
To check SSH, type: sudo raspi-config Then Select 'Advanced options'
Select Menu A4
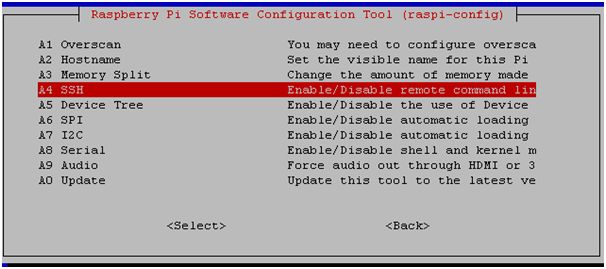
Now make sure you select enable
You should now get a window telling you it is enabled
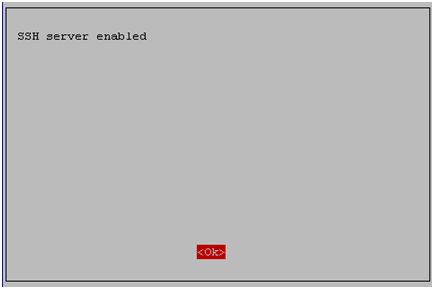
When you return to the main screen you should see this

That confirms ssh is working.
For windows users, you can download puTTY from: puTTY Download Page
It does not need installing, so just save it to its own folder then create a shortcut from it to your desktop.
Ok, now we are ready to install the SDR drivers and software. Make sure that your RTLSDR dongle is plugged into the Pi. At some point you may want to get a USB extension cable for it so that the other USB ports do not get blocked.
You will now need to enter the following commands: git clone git://git.osmocom.org/rtl-sdr.git

cd rtl-sdr/

mkdir build

cd build

cmake ../
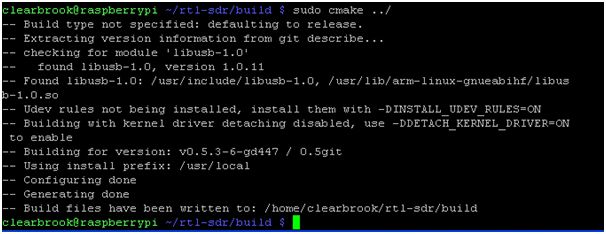
sudo make install
Your Pi will now make all of the files, starting with
Scanning dependencies of target convenience_static
Then ending with -- Removed runtime path from "/usr/local/bin/rtl_power" and returning to the prompt. clearbrook@raspberrypi ~/rtl-sdr/build $
Now finally type sudo ldconfig

Before this will work you will need to locate your RTL directory using the file manger where the drivers where downloaded and copy the rules file into the etc/udev/rules.d directory.
So you need to launch the GUI but as root so that you can copy the rules. Type startx
Once in the desktop launch a terminal session and then type in sudo pcmanfm This allows us to run file manager as root. It is a bad idea to run startx using sudo. In your Home folder you should now see an rtl-sdr folder. Open it and then copy the rtl-sdr.rules file to the /etc/udev/rules.d You can type this into the address bar to get there faster. Once done, close the file manger and terminal session, then log out of the desktop
Before you plug in the RTL-2832U stick and issue the rtl_test -t command to make sure the Raspberry Pi sees your stick reboot as sometimes your Pi will fail to see it unless you reboot first. So sudo reboot
After logging in again type: rtl_tcp -a
You may get an error like the one shown below
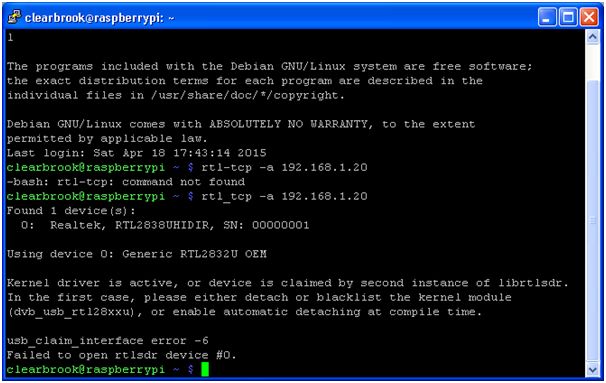
If you do, then we can quickly fix this.
Change to the /etc/modprobe.d directory and then we are going to create a file called raspi-blacklist.conf.
Type cd /etc
Then cd modprobe.d
Now we can create the file, so type sudo nano raspi-blacklist.conf
You will need to change the line blacklist dvb_usb ..2830 to 2832 for your dongle if that is the dongle you have (ideally it should be)
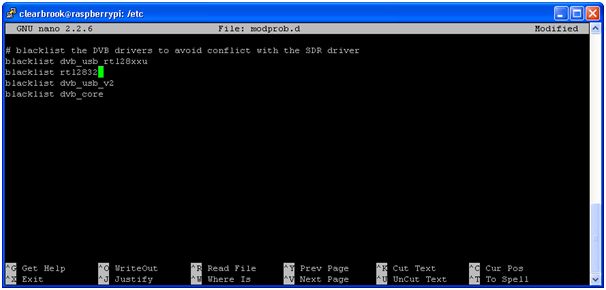
Then press Ctrl and X type y to save. Typing ls Should now show your new file

Reboot your Pi sudo reboot
Log back in and now let's run the test again rtl_tcp -a

Pat yourself on the back and reboot your Pi before the next bit!!
Now I did not want to have to ssh into the Pi every time I want to use the RTLSDR server as I want to put it out of the way on an Ethernet connection and get it to auto-start. I decided to start the rtl_tcp stream, by editing the rc.local script to start the server if an IP address is available (there may be better ways and so I would appreciated any modifications to this).
[At this point, I would strongly recommend that you give your Pi a fixed IP address. If you do not know how to do this, it is in my document that discusses accessing a Pi by remote.] Accessing Pi2 remotely
As the rc.local service is used to run commands at boot time, in the current Raspbian build, the rc.local service includes a script to detect a network connection and print-out the IP address on the terminal. That same script can be amended to automatically run rtl_tcp, if an IP address is available. All that needs to be done is to add the following new line between the printf and fi statements of the existing script.
This script sits in the etc folder so type cd /etc I typed ls here, just so that you can see the contents of the folder
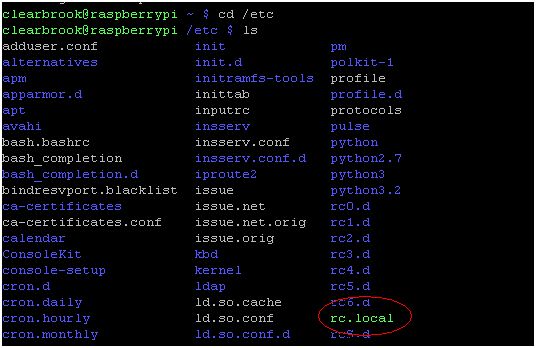
Now type sudo nano rc.local
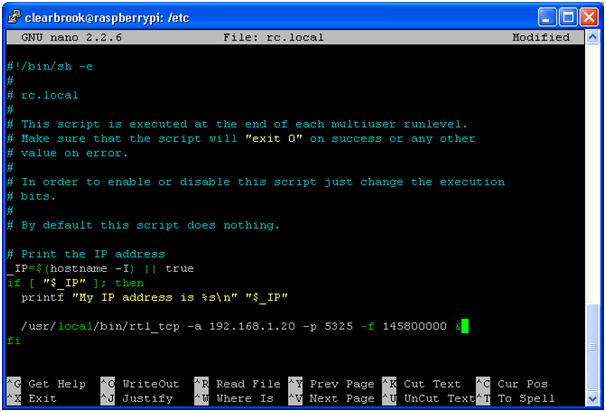
I added the following line /usr/local/bin/rtl_tcp -a 192.168.1.20 -p 5325 -f 145800000 &
Now press Ctrl and x then enter y to save your changes.
The first part starts the rtlsdr with the Pi's IP address /usr/local/bin/rtl_tcp -a 192.168.1.20
-p 5325
Tells the Pi what port to start the server on. The default is 1234 which is insecure and should not be used as it is too easy to guess So use another port. If you do not know what to use, Penguin Tutor has an excellent site including a list Penguin tutor Link
-f 145800000
Sets the frequency you want the server to start on so you need to convert MHz to KHz. I use 145.800MHz as this is the voice frequency for the International Space Station
The & symbol is used to indicate that you want it to automatically start.
Now reboot your Pi to check that it does indeed start and you get no errors.
Now you can connect to your Pi across not only your home network but also the Internet using SDR#. Download the latest version of SDR# from their website SDR# Link
Once downloaded extract the zip file, then open the folder and double-click on 'install.bat'. This will open a DOS widow and download the latest version of SDR#
When completed, you will have a text file which will give you the latest build number and a new folder called sdrsharp. Copy this folder wherever you want, it does not self install and runs directly from the SDRSharp.exe file inside so you can create a shortcut to it on your desktop.
I'm not going to cover all of the SDR# settings as there are very good tutorials already available. Just use your favourite search engine to find them
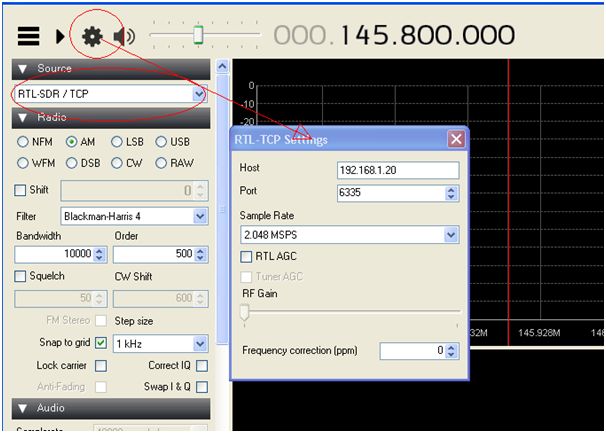
Select RTL-SDR / TCP from the drop down list then click on the cog icon to access the settings. Enter the IP address of your Pi and the port number it is using.
Across your home network, leave the sample rate at 2.048 MSPS and if you find that the dongle suffers signal overload, untick and do not use the RTL AGC. If you intend to access over the internet, this rate will have to be a lot lower depending on your connection. Don't forget that you will also need to configure port forwarding on your home router to send requests to your Pi
Some troubleshooting tips
If you find that you get lock-ups, connect your RTL Dongle to a powered hub especially if you are connecting other USB devices. Some of the RTL Dongles can be pretty demanding on their power requirements. I've also found that SDR# often fails to drop the connection properly, so logging in using puTTY and rebooting solves this.
Some folks have also reported issues with suddenly getting static. One way reported on several forums to stop this, is to reduce the number of buffers. By default, the library sets this at 32 when the server runs.
The full set of parameters are:
-a listen address
-p listen port (default: 1234)
-f frequency to tune to [Hz]
-g gain (default: 0 for auto)
-s samplerate in Hz (default: 2048000 Hz)
-b number of buffers (default: 32, set by library)
-n max number of linked list buffers to keep (default: 500)
-d device_index (default: 0)
-P ppm_error (default: 0)
so an example to reduce the buffers to 16 by editing rc.local would be /usr/local/bin/rtl_tcp -a 192.168.1.20 -p 5335 -b 16 -f 145800000 &
Reducing the sampling rate in SDR# can also help.
Thank you for reading this and have fun
So what else is there?
I built the site mainly because of my hobbies. Please note, all external links have been coded to open in a new page. I enjoy online gaming, Raspberry Pi and Arduino coding and Amateur Radio. I also enjoy gliding, flying both the real thing and Radio Control. These pages can be viewed using the links in the left-hand column.


